Créer un OCP au contrat principal à partir d'un événement de changement
Objectif
Créer un ordre de changement potentiel pour un contrat principal à partir d'un événement de changement.
Contexte
Si votre entreprise a configuré votre projet pour utiliser une structure d'ordre de changement à deux (2) niveaux, le processus d'événement de changement vous oblige à créer un ordre de changement potentiel. Ensuite, vous créerez l'OCCP à partir de l'outil Contrats principaux. Lorsque vous créez un OCP, la ventilation des coûts (VDC) est renseignée avec les valeurs du dernier prix.
Éléments à prendre en compte
- Autorisations utilisateur requises :
- Autorisations de niveau « Standard » ou supérieures dans l'outil Événements de changement du projet.
ET - Autorisations de niveau « Standard » dans l'outil Contrats principaux du projet. Le paramètre de configuration « Autoriser les utilisateurs de niveau standard à créer des OCP » doit également être activé dans l'outil Contrats principaux. Voir Configurer les paramètres : Contrats principaux.
- Autorisations de niveau « Standard » ou supérieures dans l'outil Événements de changement du projet.
- Informations supplémentaires :
- Selon le paramètre de configuration du niveau d'ordre de changement configuré pour l'outil Contrats principaux, les ordres de changement potentiels peuvent être transformés en l'un (1) des éléments suivants :
- Pour les ordres de changement à deux (2) niveaux, un ordre de changement au contrat principal.
- Pour les ordres de changement à trois (3) niveaux, une demande d'ordre de changement.
- Pour en savoir plus, voir Quels sont les différents paramètres de niveau d'ordre de changement dans Finances ?
- Selon le paramètre de configuration du niveau d'ordre de changement configuré pour l'outil Contrats principaux, les ordres de changement potentiels peuvent être transformés en l'un (1) des éléments suivants :
Conditions préalables
- L'outil Événements de changement doit être activé sur le projet. Voir Ajouter et supprimer des outils de projet .
- Le paramètre de configuration de l'ordre de changement à (2) niveaux doit être activé sur l'outil Contrats principaux. Voir Configurer le nombre de niveaux d'ordre de changement au contrat principal.
- Le contrat principal du projet doit avoir le statut « Approuvé ». Voir Approuver un contrat principal.
Procédure
- Accédez à l'outil Événements de changement du projet.
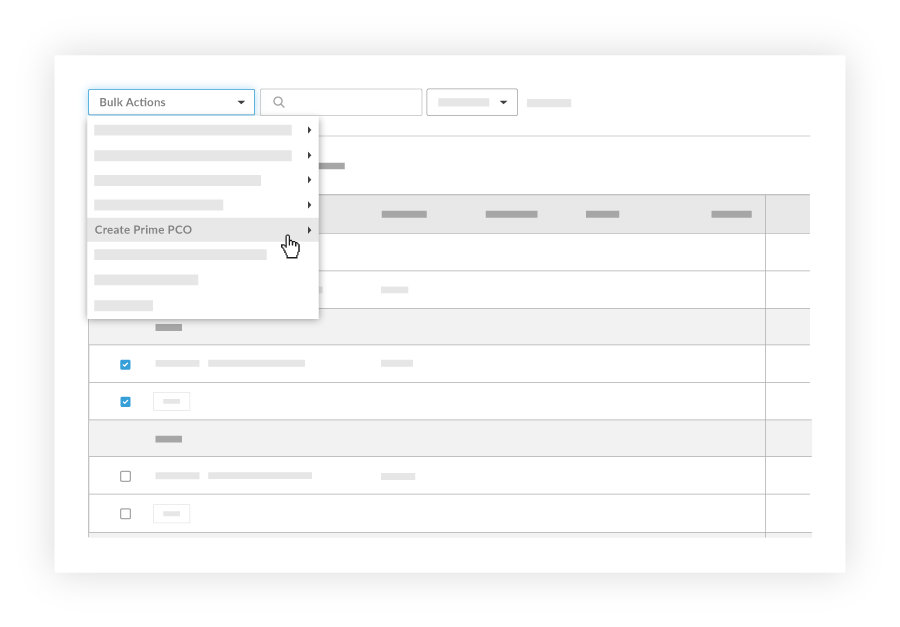
- Dans le tableau, cochez les cases correspondant à un (1) ou plusieurs postes d'événement de changement à inclure dans le nouvel ordre de changement potentiel.
Remarque
Procore crée la ventilation des coûts (VDC) de l'ordre de changement potentiel en utilisant le(s) poste(s) de l'événement de changement sélectionné(s). - Cliquez sur le menu Actions en masse et choisissez l’option Créer un ordre de changement potentiel principal . Choisissez ensuite l’option de contrat appropriée dans le sous-menu.
- Dans la page « Nouvel ordre de changement potentiel », saisissez les données suivantes :
-
Remarque
Si la fonction Demande de devis (DDD) est activée, vous pouvez configurer l'outil Événements de changement pour inclure toutes les pièces jointes ajoutées à la réponse à la DDD d'un réviseur. Pour obtenir des instructions, voir Configurer les paramètres : Événements de changement.
- Cliquez sur Créer .
Remarques
- Le menu déroulant du poste associé n'apparaît que si le compte Procore de votre entreprise est intégré à un système ERP intégré et que l'outil Contrats principaux est activé dans le projet.
- Lors de l'ajout de postes à la ventilation des coûts de l'ordre de ventilation des coûts, vous devez sélectionner un poste associé pour chaque nouveau poste. Vous pouvez désigner un (1) poste associé ou utiliser le même poste associé pour plusieurs postes. Si vous choisissez de créer un poste à associer, un poste à zéro (0) dollar est automatiquement créé dans la ventilation des coûts d'origine du contrat.
Voir également
- Ajouter et supprimer des outils dans un projet
- Quels sont les différents paramètres de niveau d'ordre de changement dans Finances ?
- Configurer le nombre de niveaux d'ordre de changement au contrat principal
- Approuver un contrat principal
- Définir les configurations par défaut de la gestion des changements
If you would like to learn more about Procore's change events management software and how it can help your business, please visit our construction change order product page  .
.